Showing posts with label arts and crafts. Show all posts

Thursday, September 17, 2009

Sewing Projects


 This morning I am off on our first 'big' vacation with Little B. We are going to the lovely town of Mt. Shasta to visit my sister (whom I haven't seen in two and a half years) and meet her little one who turns two in a week.

Before I depart I wanted to share a couple of little projects.


Weeks ago I was prompted to make these cloth balls. I really wanted Bronwyn to have a ball to explore with her hands and her mouth. Thus, the need for cloth and not plastic. While they don't bounce, they're so much fun. The papa found out that a little bounce with them on the forehead elicits a great deal of deep belly laughter.

I also was inspired to make a few gifts that were multi-functional. In this case, lavender rice pillows.


Not only can they heat the space where you lay your little one, they help to calm and soothe when placed nearby. Also, they can turn into doll pillows once little hands start getting interested in playing big.

 
I also really loved sewing the names freehand; it's a great confidence builder. The tricky part is making sure the lettering is in the middle, not too far up or down, or left or right. I still have work to do with this but am happy with how the cursive turned out.

I will have some more projects to share after the birthday presents get opened...the mountain life gets explored...two little cousins meet...and two sisters get to have some good time together!

Wednesday, September 2, 2009

It's in My Genes


When I was a little one, I remember my mom sewing and crafting all the time (well, at least when she wasn't antiquing). Each season she would be making something new. A bunny for Easter, a Santa Claus for Christmas, a quilt for our birthday, etc. She also spent a lot of time making clothes for us as well as our dolls. I don't mean simple outfits. I mean ruffles, layers, little flowers, little details everywhere...perfect clothes fit for only a princess.

So, it came as no surprise to hear that my mom is crafting something regularly now. During her non-work time she makes the fairies and mermaid you see here.

I think my two sisters and I were greatly influenced by this because we all craft now:

My oldest sister, Cindy, was the more artistic one when we were younger. Her drawings were amazing.


Which explains why the babies seen here, that she sells on E-bay, are so amazingly detailed yet SO small. How does she do it?

And check out these:


She also makes monkey and human baby reborns that are equally amazing.

My other sister Kim was the more bookish one of us all. Which explains why, when she first learned to quilt, she was quilting king-sized, appliqued quilts that same month (that's right folks, read it and weep...KING-SIZE)! She also taught herself to knit. A feat I never would have accomplished....talk about tenacity and patience.

I guess you could say, it's just in our DNA. The nurturing had a whole lot to do with it as well.

My mom just wrote this about her mom, my beloved and dearly missed, Grandma Thelma:

"I don't have the patience to quilt, it is sad I did not enjoy doing that like mom did. She would love the babies and fairies; she loved dolls. I think that is why we always had so many dolls and doll clothes. I still have a few Tammy clothes she made me; the coat is lined and has fur at the top with little pearl buttons. She wouldn't let me have Barbie and Ken because Barbie had big boobs."

I have very fond memories of Grandma Thelma having a quilting bee with her Mormon friends and everyone hand-quilting a gigantic quilt together.

***

With the holidays around the corner, it's a great time to buy your loved ones a doll, monkey or fairy. Check their store out here; their customer rating is 99.9% positive. Talk about customer satisfaction! Plus, I heard that Cindy is doing commission work if you have someone in mind...

Wednesday, August 5, 2009

Blanket Doll Tutorial

After reading about positive sleep associations, I decided to make a blanket doll for Little B (also known as a woobie or a lovey). I decided to make a tutorial out of this because: a) it is a project that is completely made from your own head and estimates (i.e. no pattern required), b) it can be made out of stuff you have around the house (provided you sew and have the basics on-hand), and finally, c) we can all use a project that can be started and completed in just a few hours.

To get started you'll need to find a pair of old tights or a t-shirt you can repurpose. I used one of my husband's worn t-shirts (out of the hundreds I had to choose from....ahem...). I then cut out a rectangle about 11" by 17".*


Fold your rectangle length-wise and sew it up, right sides facing each-other. You can also use a pair of tights or pantyhose, in which case you don't need to sew it together. Just cut off the top and bottom.

Sew up one end with thick thread or embroidery floss. This end is the top of the head and will be hidden by a hat, so feel free to make it nice, knotty and secure. Then, cut off the extra fabric above the top (about four inches worth).
Next, you will want to stuff the head with whatever filling you have. I had polyfill around so that's what I used. Make sure to pack it tight to make it washer friendly.


You can tie a rubber band around the bottom to help you sew up the bottom of the head.

However, I found it was easier to sew up without the rubber band in the way.

The next step is to cut out the top of the body. Mine was about 10" at the widest part and 11" long. As I mentioned before, I didn't use a pattern; that's what makes this project so speedy. You can see how lopsided and uneven I cut out the body (see photo above). It looks funny now, but later when you sew it up it won't be so lopsided.


Then, choose a complimentary fabric for the bottom. I chose a flannel to make one side nice and soft. Do this by laying the top onto the fabric and cut around it. Put the right sides together, facing in, and sew it up using a 1/4" seam. Make sure to leave about a 2.5 - 3.5" opening at the top to place the head and tummy inside.

Turn the body right side out and stuff the hands and feet. You can then pin each hand and foot by folding the back onto the front. This will help keep it in place, make the body more even, as well as add visual appeal.


Sew up each of the hands and feet.

Instead of using a zigzag stitch, I used a wavy one to add interest. However, because it's not as stable as zigzag, I sewed two lines to make it more secure.

Now it's time to make the hat! Cut out a large, rounded triangle. Mine was approximately 9.5" long and 9.5" wide at the base. Just eyeball the hat based on the size of the doll's head.

Sew up the side after folding it (right side together, facing inside). Turn it right side out, then fold the bottom of the hat inwards, about 1/2" or so, and sew the brim up using the same stitch you used for the hands and feet. Since there was no stuffing involved, only one seam is needed.

You can knot the top of the hat, if you like that look more.

Or keep the hat tall and pointy leaving more fabric to cuddle with.


Next, you will stuff the tummy. This part is optional, though I think it gives a nice squish to the doll for the baby to squeeze.

Then, sew up the bottom. This part will be hidden, so you can do it by machine with the zigzag stitch to make it more secure.
Place the head and tummy inside the body and sew around the head. Make sure to really stuff the head down in so there's hardly any neck. This will ensure less floppy-headedness for when the doll is being flung into the air at the protest of an oncoming nap!

Depending upon how thick the head is, you will have to hand stitch it in, machine sewing to the left and right of it.

Homestretch now. Attach the hat with pins and sew it on.


Last, embroider the face as desired. I used embroidery floss for this as well. I attempted to make a half-yawn, half-smiling mouth. It most definitely looks hand done.

Snuggle up with the doll while nursing to cover it with your loving and nurturing scent. Finally, give to your little one only at nap and bedtime. This will ensure that the sleep association is made with the object. Hope you and your little ones enjoy!

*Note: all measurements provided are for a finished blanket doll that is approximately 9" wide at the arms by 21" long from the top of the hat to the tip of the toes.

Tuesday, January 13, 2009

Blossoming and Growth

With Baby G's birthing day quickly approaching, the element of wood is very much on mind. In Chinese medicine, the element of wood is one of 5 elements and represents, among other things, birth and growth.

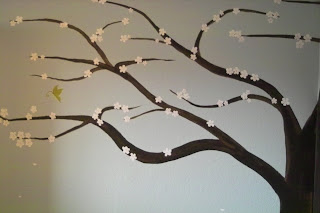
Baby G has been blessed with a talented papa who did an amazing job of painting a beautiful tree in his/her room.


Greg sketched a tree with pencil and then taped it out, followed by painting the trunk and branches. We then worked together and painted white blossoms all over.

I love spring and cherry blossoms are without a doubt the essence of spring at it's most abundant. I believe no one has captured the beauty of cherry blossom trees better than Akira Kurosawa in his film, Dreams. A must see if you haven't already indulged in it's luscious cinematography.


I completed the piece by filling in the blossoms with silver filaments and orange stamens. The green butterfly was a little addition that I think gave the piece a nice balance.

Now, Baby G will be surrounded with beauty and love whenever he/she is in the room.

Thursday, January 8, 2009

Hats off to 2009!

I'm excited about all the wonderful things in store for me this year. There are a lot of surprises awaiting, including birthing a child and becoming a mother.

Part of my journey towards this is getting a lot of crafts done beforehand since it won't be as much of a priority as soon as the little one comes.

I've been doing some knitting on the side, and happened to have completed three hats recently. The first is one of my favorite hats I make for babies, a little strawberry head. This one is for my baby - boy or girl.


The second, I made for a friend's baby boy, called the umbilical hat. This is definitely my second-favorite hat to make for a baby.


The final hat I made for my friend's birthday. It started out different than I planned it, having to use two different yarns. Many times in art, serendipitous events occur, and this was one of them; the hat will suit her better with the orange accents.
The interesting story about this hat was that I couldn't mail her present to her, well, legally anyway. I went to the post office to ship it and was asked what was in the package, innocently, I said "A hat. A hand sewn hat." The postal worker said he wasn't sure it was allowed. I laughed and smiled at him, until I realized, this dude was serious.

He then showed me the screen of forbidden items imported to Italy while reading it, "Haberdashery and sewn articles of any kind, including trimmings and lace; handkerchiefs; scarves; shawls, needlework including stockings and gloves; bonnets, caps, and hats of any kind," he read quite pointedly. Oh boy, perfect. A belated birthday present that will be seriously belated if I have to wait to see her. Unbelievable!

In the end, I sent it to her at another post office and lied on the customs form, crossing my fingers to make sure it makes it her way. To see what other nonsense Italy doesn't allow, click here. The list is quite odd.

Pray this makes it to you, Ambra!

Monday, January 5, 2009

A Year and a Day

It's amazing how much the satisfaction of a project doesn't always correspond to the time invested in it. I experienced this keenly last year when I finished two projects days apart from each other.

The first - a hand embroidered stocking - I completed just before Christmas and had started over a year ago. Little did I know how long it would take when my husband selected it online to make for him...the first trivial experience that made me wish I had a time machine.

Okay, I admit, it wouldn't have taken a year had I worked on it with more consistency. However, if you consider that the sleigh alone took 12+ hours (not including what is in it), it might give you an idea of how much time it really did take. So many hours I care not to calculate.

I am so glad to be finished with that project and will definitely never hand sew a stocking again. I promise! While I am satisfied with how it turned out, I'm mostly satisfied to be done with it.


The other project was a necklace I made for my mother-in-law for Christmas. It took less than a day to select the beads and to design and assemble it. It turned out so beautiful that I wanted to keep it and show off the beautiful smoky quartz myself.

One doesn't appreciate the stocking more - despite the excessive time involved - or the necklace less. Both projects are beautiful in their own way, the latter simply allowed for many other beauties to be born. So, here's to more necklace projects in the year ahead, for us all!

Monday, December 15, 2008

A Poem for Baby G

So, yesterday I had my first shower for little Baby G. My friend Rachel helped put it on for my husband, Greg, and I. We decided to make it a combination blessing/shower. Even though I was a bit tentative about having a large group for an intimate blessing, it turned out very well.

First, we ate some spectacular food, cooked by Rachel, and drank mimosas, then we had the blessing. It consisted of people reading poems, sayings, and thoughts that they had either written or were inspired by. I had people transfer them to muslin so that I could sew up prayer flags. (With so many, I'm thinking of a different project I could do with them to give to the baby when he/she is older. Ideas?)

In any case, it was a group of just under 20 and everyone appeared comfortable with the blessing, including little 22 month old Melly who was nursing and humming along, doing her own blessing of sorts.

Since I haven't been inspired to write a poem in a long time and it came so organically, I wanted to share what I wrote for little Baby G.
***

Gifts for Your Birth Day

You are a product of a joyful and loving nature.
Your father and I conceived you with our love
and everyday we fall deeper in love with each other.

This is our first gift to you, Baby, our presence to each other.

The divine has sent us caregivers who will honor and rever your passage.
A spiritual and talented midwife and assistant
who will allow you to choose when and how you want to be born.

This is our second gift to you, Baby, Constance and O'Nell's presence to the birth of our family.

On the day of your tender passage - from water to air - womb to world -
I choose to be fully aware and lucid to every stirring,
every movement and need that you will have during your transition.

This is our third gift to you, Baby, your mother's full and complete bodymind presence.

On that glorious day - your birth day - we will be there
to honor and greet the divine in you.
We will welcome and cherish you.

This is your gift to us, Baby, your beautiful, wonderous, and magical presence.
Our precious baby, we are so in love with you.
***
Update: I ended up sewing together these prayer flags and hanging it up in Little B's room....the room where she was born. I'm sure these prayers helped me to have the birthing experience I desired.